How to Test Database Queries and More with Node.js
This blog post is a cross-post of the article originally published on Medium.
Getting an application to work, most of the time is somewhat trivial. Enough trial and error and you have something to show off. However, as you code more, the vicious cycle of coding, breaking, and fixing chips away at your soul. Manual testing of the last few changes that you have made to your codebase always leaves a bad taste in your mouth.
In order to make reliable and maintainable applications, we cover our business logic and implementation details with automated tests as much as possible. However, setting up a testing environment becomes more and more complex as you move up in the pyramid of testing.
It is fairly easy to test a code that does not include any complex I/O operations. Just use mocks/stubs/spies, and test the pure business logic. However, things do get interesting when we are talking about databases.
In this article, we will:
- Create an integration testing environment by using Jest and Docker containers;
- Write a test suite for a query that solves an example business use-case;
- Add integration tests to Gitlab/Github CI pipelines, so that they will break our builds in case they fail.
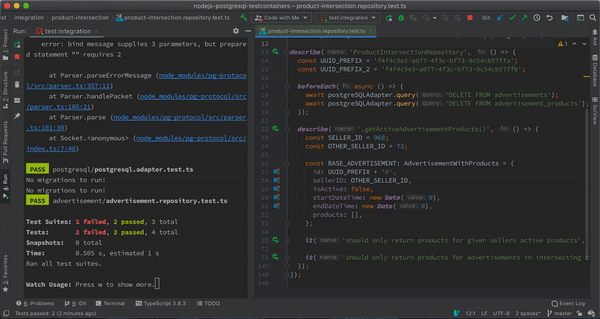 Integration Tests Running in Jest Watch Mode
You can check out the source code for the article here.
Automating the Testing Process for Database Queries
When one thinks of simple K/V databases or simple CRUD applications, there may not be a lot of things going on in the database. However, as we create larger applications, some of the logic we implement may slip into the database layer. This may be caused by the reasons of data integrity, performance, or convenience.
We end up launching a GUI to interact with our database. We create indexes and views. We write queries and test them manually. Just think about all those times when you manually inserted/edited some data to your database, ran some queries, inspected the results — and repeat. This is exactly where you need to take a step back and think about how to automate all of these.
Automating these will not only make it easier to write the query itself but also it will give you confidence in the future when you would wish to modify the query. In order to provide you a context, let us talk about a real business use-case in which it would make sense to test our database queries.
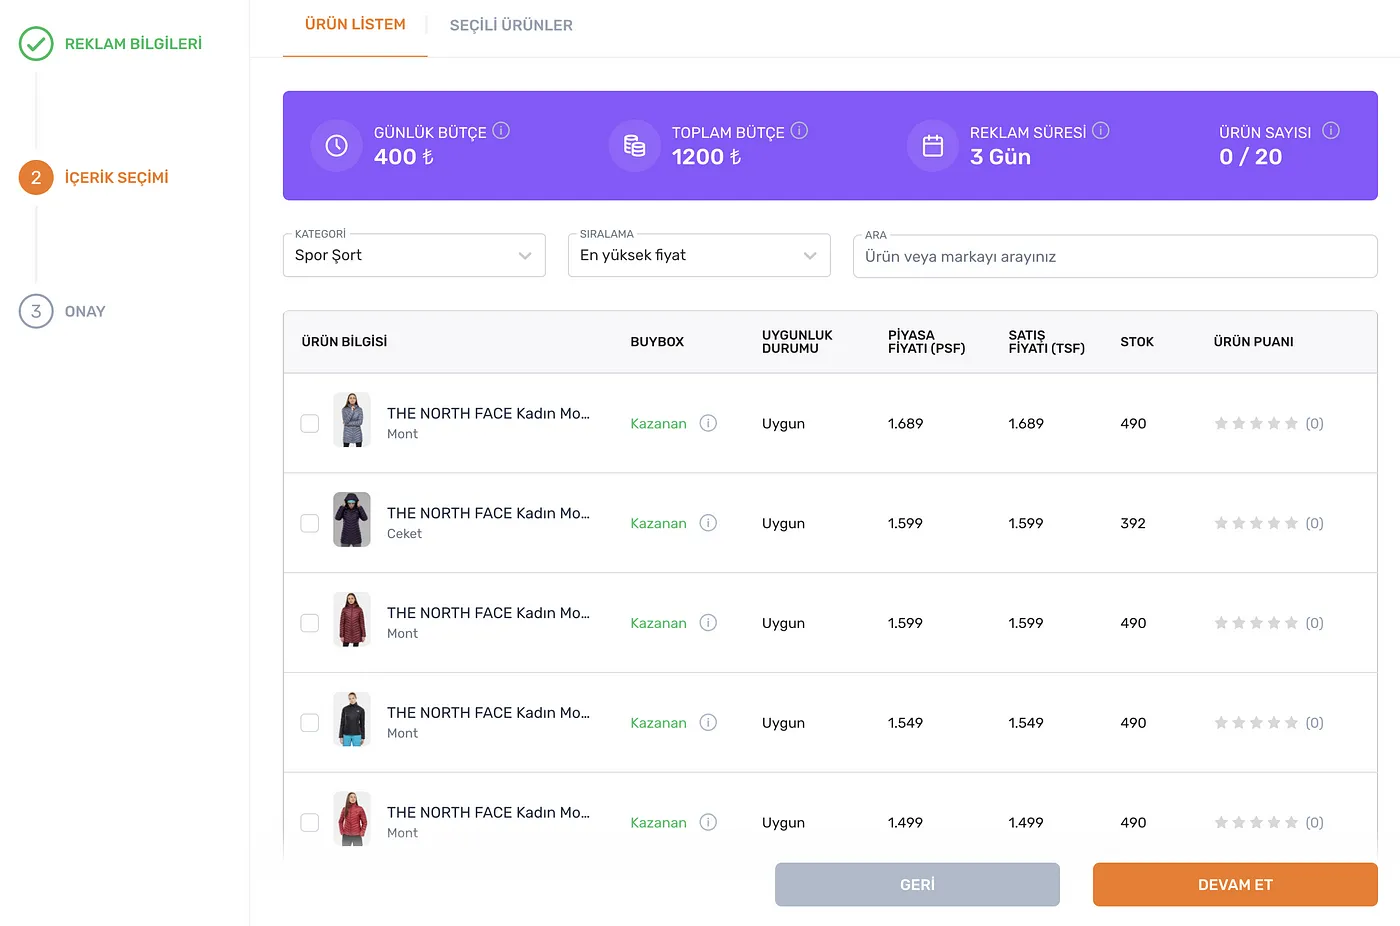 Production Selection for an Advertisement Campaign
We have an advertisement platform that can be used to create and manage product advertisement campaigns by the sellers who are in our ecosystem.
Sellers can pick a time period, budget, and some of the products that they sell to start an advertisement campaign.
A seller cannot pick the same product for two different advertisement campaigns that are active in the same time period.
Sellers who create an advertisement choose the budget and the time period before choosing products. So, when they reach the product selection page, we would like to disable the products which they have already chosen for another active campaign in the overlapping time periods.
Let us assume we are using a PostgreSQL database, and we have two tables. One table is to contain the campaign details, meanwhile the other is to contain what campaigns having what products within them.
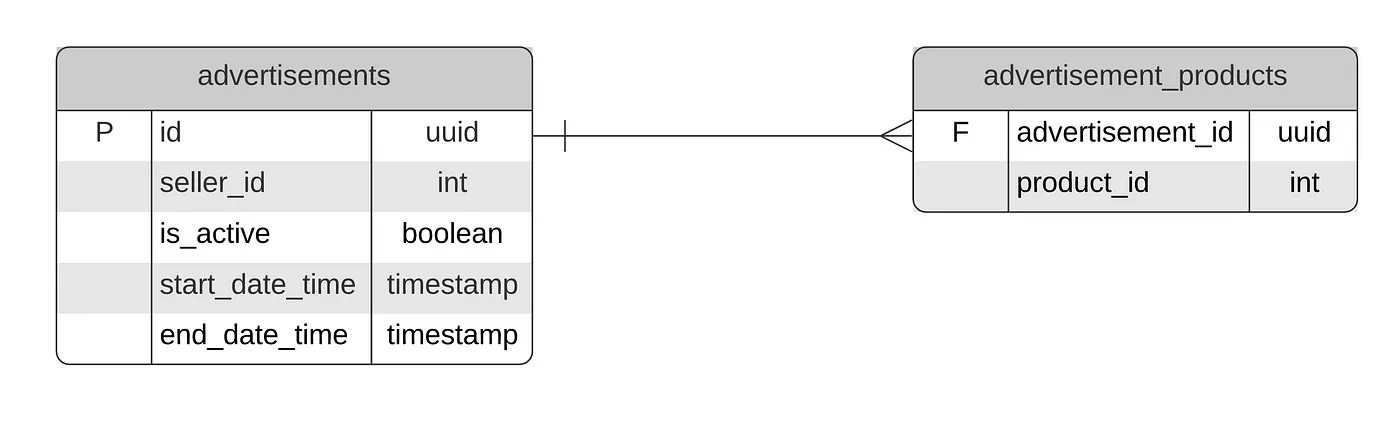 The DBMS ER Diagram Showing our Tables
To meet our use-case, we need to write a query that is somewhat complex. We already know the business expectations for our query. It would really be helpful if we can write our expectations as test cases one-by-one, and then iterate with different queries until we write and pass all of the test cases (TDD).
These tests will also help us in the future in case the business use-case changes. For our example, we may decide to make the end date optional. In this case, we will be sure that the changes we add do not break the old use-case. And we will add new test cases while modifying our query.
To create a testing environment for this purpose, we need to pay a one-time cost of setting it up. Our setup will start an isolated PostgreSQL instance, wait for it to initialize, and create the necessary tables/indexes.
Creating an Integration Test Environment with Jest and Docker
Before the container era, it was a lot of hassle to set up a database locally for development purposes. However, now, most of the databases can be started locally with a single Docker command. Better yet, the Docker engine you have on your computer can be accessed via an API, meaning that we can programmatically start and stop containers.
This is where the idea of Testcontainers comes from. It is a Java library that makes it easy to start some sets of containers and makes them available for your test suites. The same library has implementations in other languages, such as Node.js. By using testcontainers-node, we can start a Docker container for each test suite we have.
However, most of the time, you can make do with a single database container for all your tests. This is more needed if the database you are using is consuming a lot of resources. To make this setup easier and to make things more configuration based, we created a library called jest-testcontainers, and we will be using this library for creating our PostgreSQL testing environment.
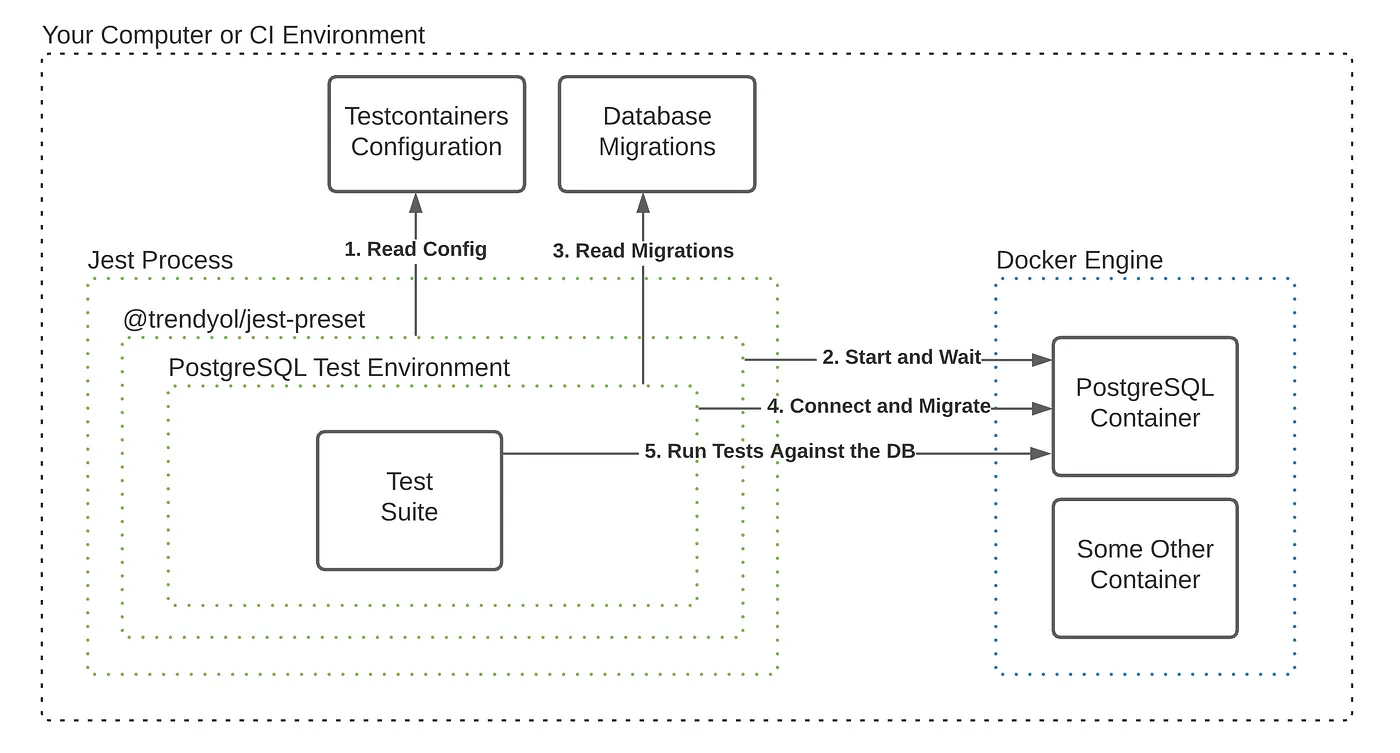 The Diagram of How Jest-Testcontainers Work with Jest and Docker
We only need Docker and Node.js installed on our machine. Then, we can run npm install --save-dev @trendyol/jest-testcontainers to install this library. And add it as a preset to our jest.config.js`` file as preset: ‘@trendyol/jest-testcontainers’`
jest-testcontainers is ready to set up our environment for us now. We can create a configuration to tell it to start a specific version of PostgreSQL and wait until it sees “server started” in the logs.
module.exports = {
  postgre: {
    image: 'postgres',
    tag: '12.3-alpine',
    ports: [5432],
    env: {
      POSTGRES_PASSWORD: 'integration-pass',
    },
    wait: {
      type: 'text',
      text: 'server started',
    },
  },
};
Now, we have a PostgreSQL database that initializes before our Jest test suites and gets cleaned up after all our test suites finish (or exit unexpectedly). After migrating this database with our schemas, we can run our test cases on it.
I will spare you the details of doing the migration prior to your test suites. Instead, you can check this commit to see the whole jest-testcontainers setup for our example project.
Writing Test Cases for our SQL Query
After setting up the environment for our integration tests, we can get back to our business use-case and write our SQL query.
Here, our aim is to implement a feature to disable the products which are already in use in an active advertisement campaign. We need to implement a method that accepts a seller id and a time range as parameters. This function, using these parameters, will return all active advertisements for the given seller in the overlapping time periods with the time range given. So, we can imagine a class as follows:
export class ProductIntersectionRepository {
  constructor(private readonly postgreSQLAdapter: PostgreSQLAdapter)

  async getActiveAdvertisementProducts(
    query: ProductIntersectionQuery
  ): Promise<AdvertisementWithProducts[]>
}

type ProductIntersectionQuery = {
  sellerID: number;
  startDateTime: Date;
  endDateTime: Date;
};
Here we have the opportunity to practice the TDD by writing failing tests first, then the query itself. It will be better if we can break the problem into smaller parts so that we can implement it in iterations. For our problem, we can divide it into two parts and see how it goes.
- Filter advertisements by active/inactive status + seller id
- Filter advertisements by time overlap
Filtering Advertisements by Status and Seller ID
Since this will be the first test case we write, we need to do more than just writing the test case itself.
- We need to initialize the repository, which we will test, with the PostgreSQL adapter.
- Before each test case, we remove every data from advertisements / advertisement_products tables, so test cases will have their own data and will not interfere with each other
- We define common variables that will be used throughout test cases.
Let us see how all of these with the test-case itself look in Typescript.
const postgreSQLAdapter: PostgreSQLAdapter = (global as any).postgreSQLAdapter;
const adRepository = new AdvertisementRepository(postgreSQLAdapter);
const repository = new ProductIntersectionRepository(postgreSQLAdapter);

describe('ProductIntersectionRepository', () => {
  const UUID_PREFIX = 'f4f4c9e3-a077-4f3c-bf73-9c54cb57ffa';

  beforeEach(async () => {
    await postgreSQLAdapter.query('DELETE FROM advertisements');
    await postgreSQLAdapter.query('DELETE FROM advertisement_products');
  });

  describe('.getActiveAdvertisementProducts()', () => {
    const SELLER_ID = 968;
    const OTHER_SELLER_ID = 73;

    const BASE_ADVERTISEMENT: AdvertisementWithProducts = {
      id: UUID_PREFIX + '0',
      sellerID: OTHER_SELLER_ID,
      isActive: false,
      startDateTime: new Date(0),
      endDateTime: new Date(0),
      products: [],
    };

    it('should only return products for given sellers active advertisements', async () => {
      const advertisements: AdvertisementWithProducts[] = [
        { ...BASE_ADVERTISEMENT, id: UUID_PREFIX + '1', sellerID: SELLER_ID, isActive: true, products: [1, 2, 3] },
        { ...BASE_ADVERTISEMENT, id: UUID_PREFIX + '2', sellerID: SELLER_ID, isActive: false, products: [4, 5, 6] },
        { ...BASE_ADVERTISEMENT, id: UUID_PREFIX + '3', sellerID: OTHER_SELLER_ID, isActive: true, products: [7, 8, 9] },
      ];

      const expectedResult = [advertisements[0]];

      await adRepository.insertAdvertisementsWithProducts(advertisements);

      const result = await repository.getActiveAdvertisementProducts({ sellerID: SELLER_ID });

      expect(result).toEqual(expectedResult);
    });
  });
});
Besides doing the initial test setup, the test-case itself is pretty small and starts at Line 27. We just initialize 3 advertisements. The first advertisement belongs to our seller and is active. The second advertisement belongs to our seller; however, it is not active. The last and third advertisement is active but does not belong to our seller.
We expect only the first advertisement to be returned by our method. Before implementing the query itself, let us run this query and see that it fails.
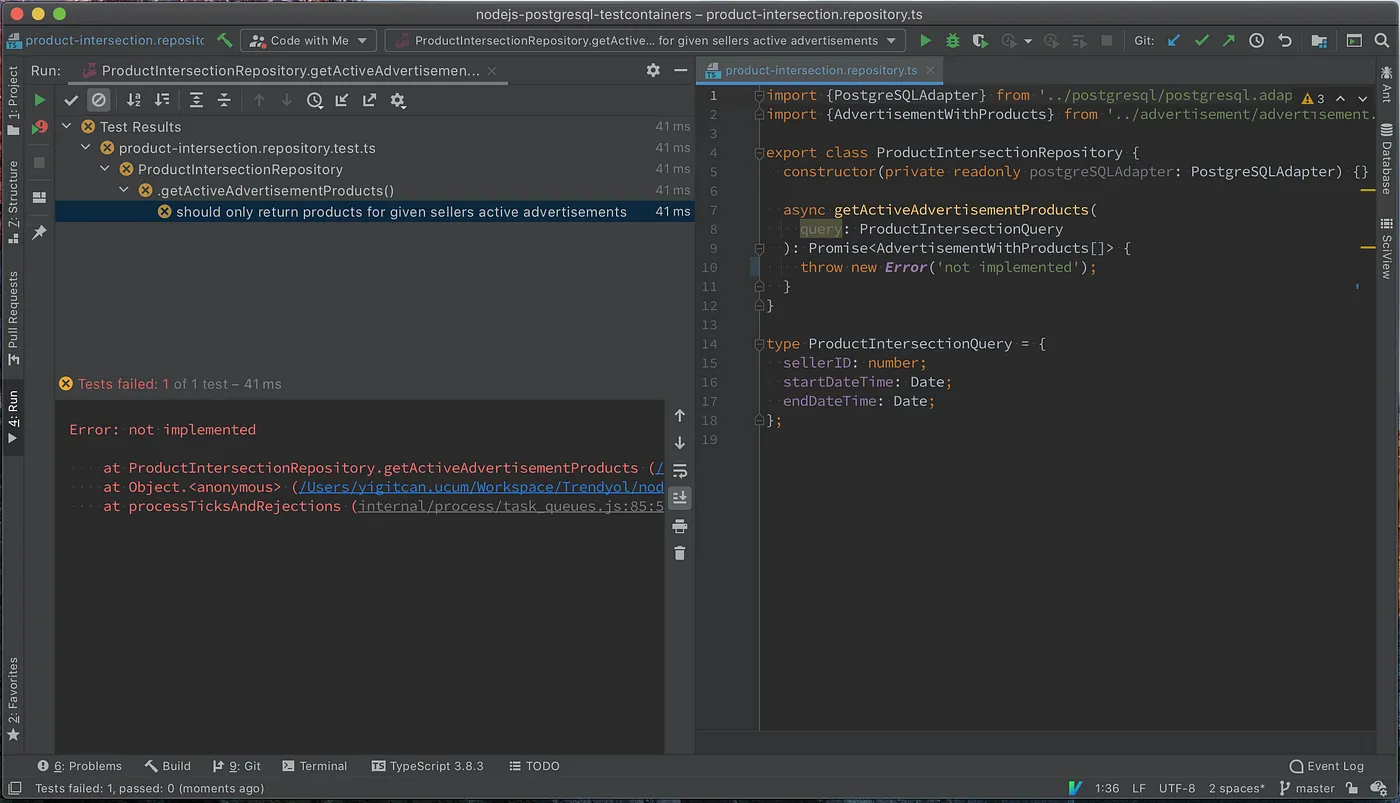
The test fails since we did not implement the query itself. We can go ahead and implement the query. And re-run our query.
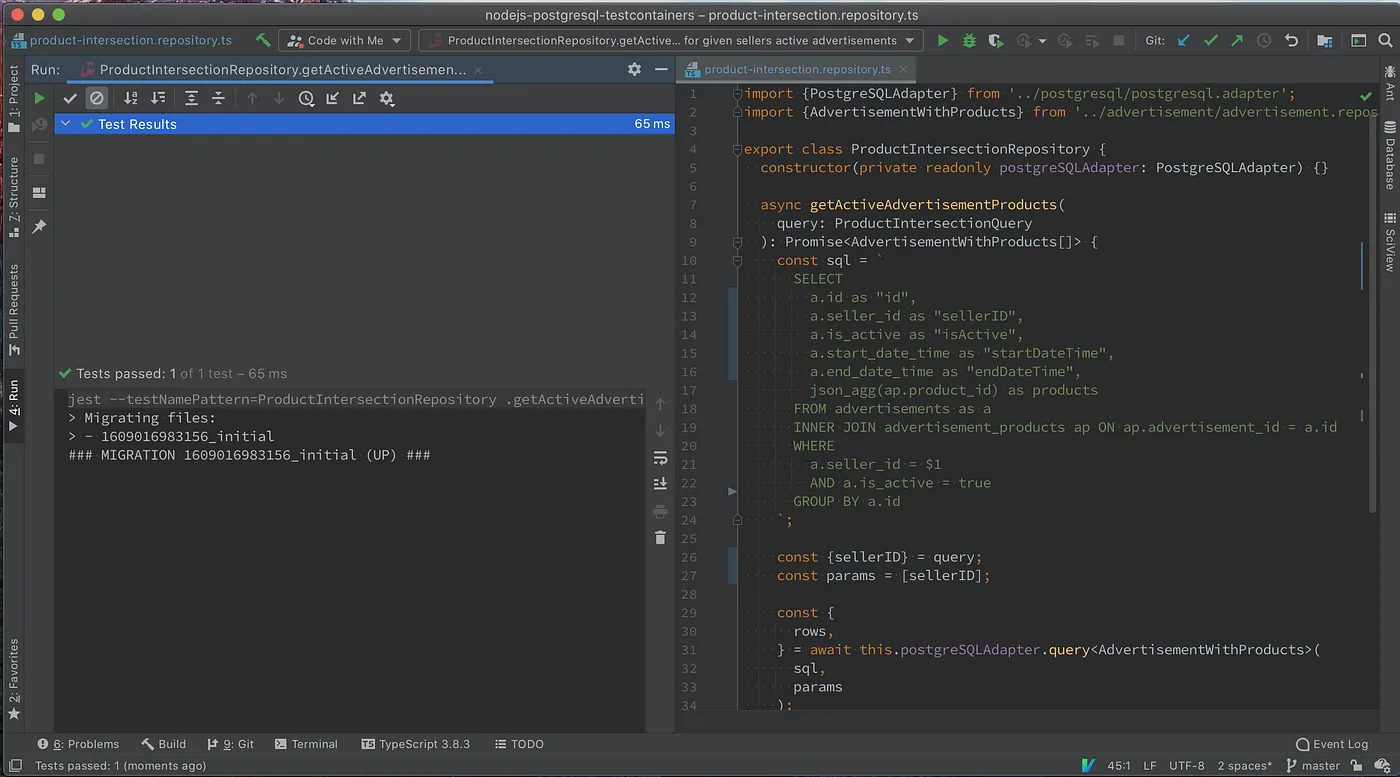
Now, our tests are green and everything is working as expected 🎉 Check this commit for implementation of the method and the initial query.
Filtering Advertisements by Time Overlap
We have a method that returns active advertisements for a given seller. The next part is to add the time overlap checks. It will be better to visualize this in our minds before moving on to writing the test cases themselves.
Let us think of a continuous timeline where we pick a start and an end date-time. We can have advertisements overlap with this timeline in multiple ways. Let us use a Gantt diagram to visualize this situation.
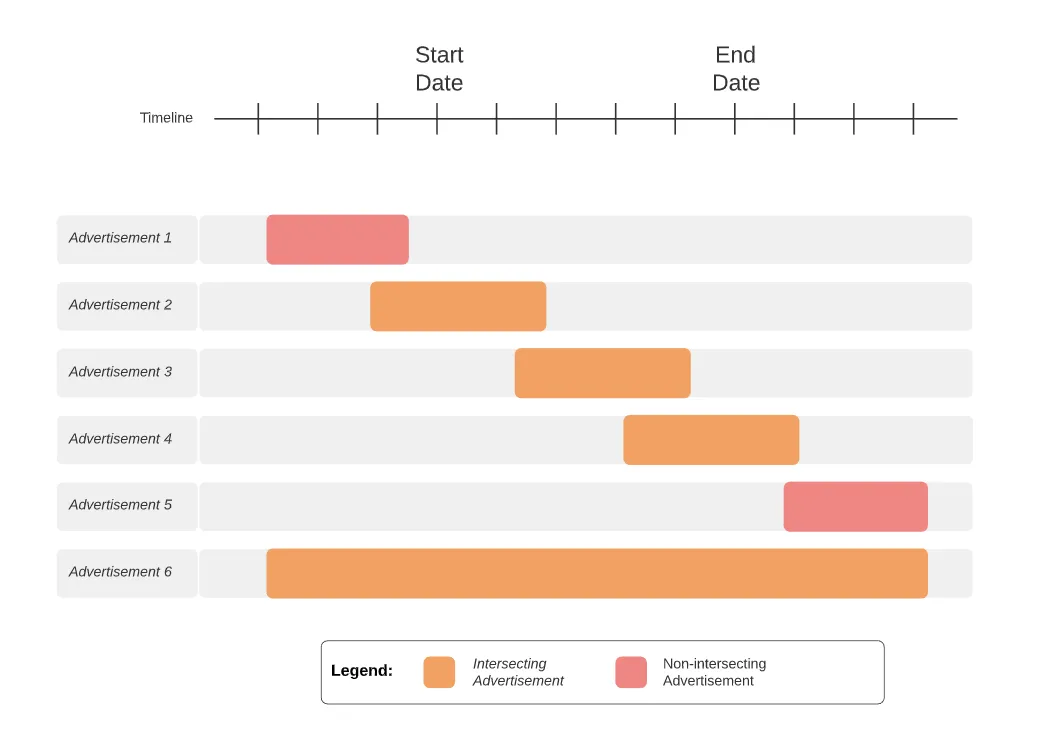 A Gantt Diagram Showcasing Different Advertisement Time Overlaps
After creating this visualization, creating the test case itself will not be much of a challenge. We do not have to deal with the boilerplate test code this time because we already implemented it in the first iteration. Let us see how the test-case itself looks in Typescript.
describe('ProductIntersectionRepository', () => {
  // same code with previous step

  describe('.getActiveAdvertisementProducts()', () => {
    // same code with previous step

    it('should only return products for given sellers active products', async () => {
      // same code with previous step
    });

    it('should only return products for advertisements in intersecting times', async () => {
      const startDateTime = new Date(5);
      const endDateTime = new Date(10);

      // all advertisements are active and owned by our seller
      const baseAdvertisement = { ...BASE_ADVERTISEMENT, sellerID: SELLER_ID, isActive: true };

      const intersectingAdvertisements: AdvertisementWithProducts[] = [
        { ...baseAdvertisement, id: UUID_PREFIX + '1', startDateTime: new Date(4), endDateTime: new Date(5), products: [1, 2, 3] },
        { ...baseAdvertisement, id: UUID_PREFIX + '2', startDateTime: new Date(6), endDateTime: new Date(7), products: [2, 3, 4] },
        { ...baseAdvertisement, id: UUID_PREFIX + '3', startDateTime: new Date(10), endDateTime: new Date(11), products: [5, 6, 7] },
        { ...baseAdvertisement, id: UUID_PREFIX + '4', startDateTime: new Date(4), endDateTime: new Date(11), products: [7, 8, 9] },
      ];

      const nonIntersectingAdvertisements: AdvertisementWithProducts[] = [
        { ...baseAdvertisement, id: UUID_PREFIX_2 + '1', startDateTime: new Date(4), endDateTime: new Date(4), products: [10, 11] },
        { ...baseAdvertisement, id: UUID_PREFIX_2 + '2', startDateTime: new Date(11), endDateTime: new Date(11), products: [12, 13] },
      ];

      await adRepository.insertAdvertisementsWithProducts([...intersectingAdvertisements, ...nonIntersectingAdvertisements]);

      const result = await repository.getActiveAdvertisementProducts({ sellerID: SELLER_ID, startDateTime, endDateTime });

      expect(result).toEqual(expect.arrayContaining(intersectingAdvertisements));
    });
  });
});
As you can see, we created two groups of advertisements; both of these advertisement groups include active advertisements that are owned by our seller. However, only the first group overlaps with our given time range.
We expect only the first group to be returned by our method. However, running this test will fail because the method currently returns all of the active advertisements for our seller. We can go ahead and implement the filtering by the time overlap as well. Check this commit for how we modify our query to pass this test.
And we are done! We implemented our query by using the TDD methodology. It may seem to be a lot of work only for a query. However, it will be much more meaningful when we start getting new feature requests. To try this out for yourself, you can go ahead and implement:
- Excluding a given advertisement id from the list returned;
- Making end dates optional, so some advertisements may run indefinitely;
- Only returning distinct product ids instead of all advertisement info.
You will surely feel more confident after making these changes because you already have tests for the initial version of the query. However, it will not be enough that we are the only ones writing these tests.
Adding Integration Tests to your CI environment
Tests are like documentation. Do you know what documentations are famous for? They are famous for being outdated. Unless you take precautions by running your integration tests in your CI pipeline, these tests will get outdated and lose their meaning really fast.
Codes that test your database queries, just like your unit tests, should run on each commit to your feature branches. This way, before you merge a feature branch to your trunk or staging branch, you will be sure that it does not break your database related methods.
As we know, testcontainers uses Docker for starting containers for your test. That is why, your tests will require a Docker engine running in your CI environments. This can be done in numerous ways:
- You can have a Docker engine running in a separate environment to which you can access;
- Your CI environment may be running your CI Jobs in a Dockerized environment and you can use the same Docker Engine that starts your CI Jobs for testing (Docker-out-of-Docker);
- Your CI environment, along with your CI Job container, can create a Docker Engine to which you can access. So, each of your CI jobs will have a private Docker Engine instance that gets started and deleted alongside it (Docker-in-Docker).
Testcontainers supports all of these scenarios. And you do not need to worry about sharing Docker Engine between multiple CI Jobs because Testcontainers will clean up themselves and leave no zombie containers living around. This means that you can choose any of the abovementioned options. We will show Gitlab CI and Github Actions as examples.
Adding Our Tests to Gitlab CI
Gitlab’s services feature lets us start a Docker Engine next to our CI job (Docker-in-Docker), so we can utilize this feature to run our tests as follows:
stages:
  - test

integration-test:
  extends: .node-cache
  stage: test
  image: node:14-alpine

  services:
    - name: docker:20.10.1-dind
      command: ['--tls=false', '--host=tcp://0.0.0.0:2376']

  variables:
    DOCKER_HOST: "tcp://docker:2375"
    DOCKER_TLS_CERTDIR: ""
    DOCKER_DRIVER: "overlay2"

  script:
    - export CI=true
    - npm ci
    - npm test
    - npm run test:integration

.node-cache:
  cache:
    key:
      files:
        - package.json
        - package-lock.json
    paths:
      - node_modules
Besides starting a Docker Engine and connecting to it, the above configuration does:
- Cache the node_modules for faster subsequent runs;
- Configure the Docker Engine to listen to both 2375 and 2376 for overcoming a Gitlab services health-check issue. (see issue 4143 for more details.)
You can see the above yml in action here running on shared Gitlab CI runners.
To further optimize this yml, you can use a Docker Registry mirror and run a custom registry next to your Gitlab CI runners. This way, pulling the Docker images will be faster for subsequent runs.
Adding Our Integration Tests to Github Actions
Github spins up a virtual machine that has access to a Docker engine, so we do not need any additional setup but to install Node inside the virtual machine, and run our tests.
name: 'Lint and Tests'

on: push

jobs:
  test:
    name: Lint and Test Code Base
    runs-on: ubuntu-latest

    strategy:
      matrix:
        node-version: [14.x]

    steps:
      - uses: actions/checkout@v2
      - name: Use Node.js ${{ matrix.node-version }}
        uses: actions/setup-node@v1
        with:
          node-version: ${{ matrix.node-version }}

      - uses: actions/cache@v2
        with:
          path: '**/node_modules'
          key: ${{ runner.os }}-${{ matrix.node-version }}-modules-${{ hashFiles('**/package-lock.json') }}

      - run: npm ci
      - run: npm test
        env: {CI: 'true'}
      - run: npm run test:integration
        env: {CI: 'true'}
Without a similar config, Github actions run these tests faster than shared Gitlab runners as you can see here. I assume this is not just related to the change of approach of accessing to Docker engine but to the quality of shared runners available on Github actions. We can get similar/better times on our on-prem Gitlab.
Conclusion
By now, we learned how to create an integration testing environment for our database queries, wrote tests for an example business use-case, and set up a CI job to run these tests on our CI pipeline. We can now write our database queries without even opening the database client GUI. And we can make sure that everything is working correctly with automated tests that run on CI.
Even though we went with the example of testing our database queries, the main idea is to start a Docker container and run tests against those containers. So, we can extend our jest-testcontainers-config.js to test much more, like some NoSQL database, our messaging queue implementation, caching layer, etc. We can even start all dependencies of our application (database, queue, mock server with wiremock) to run acceptance tests.
Bear in mind that this is just one approach to create integration tests for your project. The same result can be achieved via manual scripting or using other tools. Please check out our example on Github and let us know how this approach works for you.